BuyerBridge’s MarketAnalyzer Tool generates key insights that help you identify which channels are relevant to your clients' markets.
Take a look inside the MarketAnalyzer Tool here!
Use the tool to unlock powerful data that is critical for making data-driven decisions to increase your clients’ ROI.
NOTE: The app is fully responsive across desktop, tablet, and phone interfaces - the phone UI is completely different!
The MarketAnalyzer Tool will generate a market report for your client in just 3 simple steps, and users will have the opportunity to customize certain aspects of the report.
Getting Started With the MarketAnalyzer Tool
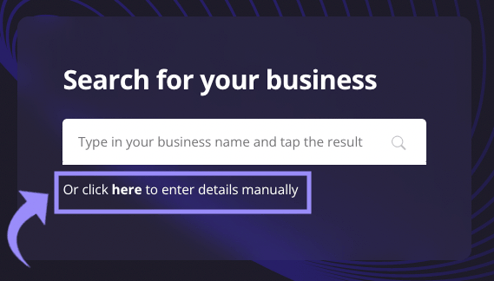
Step 1: Search for your client’s business
- Type in your client’s business name
- Tap the result
Users will have the option of entering their client’s business details manually by clicking inside of the text box where their client’s business name is located, OR from the bottom of “Search for your business, where it says “Or click here to enter details manually.”
- Confirm that the Business Name, Business Website, and Location of the business are accurate.
-
-
- If the information populated for the Business’ Name or Website is inaccurate, you can update it by clicking inside of the textbox and replacing what’s there.
- If the location marker does not look accurate, drag the marker to a more precise location.
-
- Click “Continue.”
Step 2: Confirm Your Client’s Target Market
The tool will identify your client’s audience size on each advertising channel (Facebook, Snapchat, TikTok, & Pinterest).
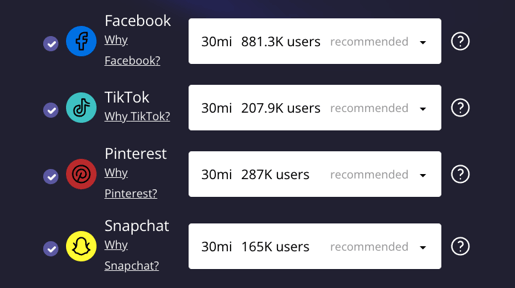
By default, the audience size for each channel will be based on a 30-mile radius surrounding your client’s business location.
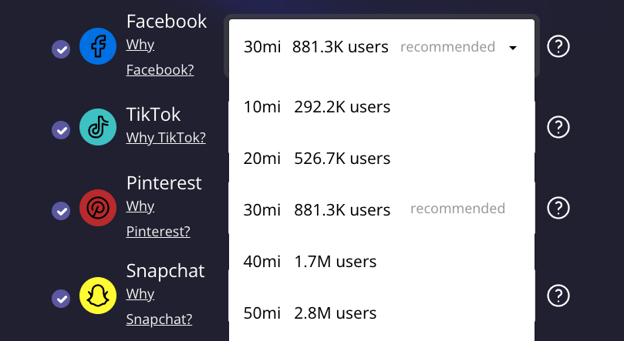
BUT, we also pull multiple radii across each channel so users can select which one they want to focus on (which can also be changed in the report)!
Users will have the option to use a 10, 20, 30 (recommended), 40, or 50-mile radius for targeting, and the # of users for the channel will reflect the mile radius that is selected.
- To customize the mile radius used for targeting: click the channel drop-down menu > select a different mile radius.
At the bottom of the screen will be your client’s total estimated audience size based on the radius you’ve selected.
The tool will recommend that you target a specific % of your client’s total audience based on the average amount of automotive in-market shoppers.
- To adjust your client’s target audience size: drag the purple slider to increase or decrease the audience size you’ll be targeting.
Above the slider you will see numbers that range from 1 to 100 - these numbers reflect the % of your total audience size. For example, 1 = 1% of the total audience, 10 = 10%, etc.
Step 3: View Market Report
Once you have confirmed your client’s market and identified their target audience > click View Market Report.

Customizing Your Client’s Market Report
Throughout all Market Reports, you will have the ability to customize your client’s audience:
- Click “customize” > the “Customize Audience” slide-out panel will display.
From the “Customize Audience” slide-out, you will be able to edit the following:
- Geographic Area
- CPM
- Frequency
- Audience Size
Geographic Area Customizations
To make changes to the Geographic Area your client will be targeting: click “Geographic Area” > drop-down the options > select the new radius you wish to target.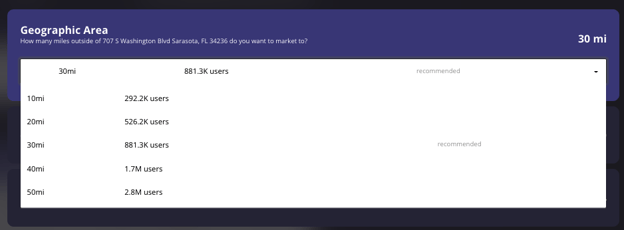
CPM Customizations
Easily change your client’s estimated CPM: click “CPM” > drag the slider to increase or decrease the CPM.

Frequency Customizations
To adjust how often you want your client’s ads to be shown to customers on a monthly basis: click “Frequency” > drag the slider to make Frequency either higher or lower.

Audience Size Customizations
Modifying your client’s Audience Size is simple: click “Audience Size” > drag the slider to increase or decrease the % of your client’s addressable audience you would like to target.

All customizations you make inside of the Market Reports will be reflected in real-time.
Start using the report here!